How to install Elasticsearch on Fedora 28

Overview of the issue

I went to install Elasticsearch on a newly built Fedora 28 VM. For my first attempt, I tried to use the built-in repo as follows

sudo yum update
sudo yum install elasticsearch

However, when I started Elasticsearch, it failed to launch with the following error.

Could not find netty3-3.9.3 Java extension for this JVM

My first effort at resolution involved searching on-line for a solution. Some solutions recommend fixing Open JVM. However, it seemed to me to be a more straight-forward solution to just install the Oracle JVM. So, I removed Open JVM and installed Oracle JVM instead. This resolved the issue and Elasticsearch started normally.

Summary of my steps

Download the latest Oracle JVM from Oracle JVM Download

Install the repo with the following command.

sudo rpm -Uvh jdk-10.0.1_linux-x64_bin.rpm

I used the alternatives command to point to my java version.

alternatives --install /usr/bin/java java /usr/java/latest/jre/bin/java 200000

This installed the Oracle JVM.

Next, install Elasticsearch. This time I used a more recent Elasticsearch repo.

Import the GPG key

rpm --import https://artifacts.elastic.co/GPG-KEY-elasticsearch

Create /etc/yum.repos.d/elasticsearch.repo as below

[elasticsearch-6.x]
name=Elasticsearch repository for 6.x packages
baseurl=https://artifacts.elastic.co/packages/6.x/yum
gpgcheck=1
gpgkey=https://artifacts.elastic.co/GPG-KEY-elasticsearch
enabled=1
autorefresh=1
type=rpm-md

Run the install of Elasticsearch.

sudo yum install elasticsearch

Configure Elasticsearch to run at boot-time with the following instructions.

sudo systemctl daemon-reload
sudo systemctl enable elasticsearch

Start Elasticsearch with

sudo systemctl start elasticsearch

Finally, confirm that it has started correctly.

systemctl status elasticsearch
How to Set up a Minikube Lab with VMware Workstation

Recently, I started looking at Kubernetes. As a first step, I went through the tutorial on how to install Minikube. On this link, we get the instructions on how to set up Minikube on Windows 10 using either Hyper-V or VirtualBox as a hypervisor. However, my preference is to use VMware Workstation as the hypervisor. When I went through their tutorial, I found that the documentation for setting this up was not available on the MiniKube vmware driver page at the time of writing. After troubleshooting, I installed Minikube and managed to get it working with VMware Workstation. Here are the steps that I followed.

Install a Hypervisor

Install Docker machine driver

  • Download Docker machine driver docker-machine-driver-vmware_windows_amd64.exe from https://github.com/machine-drivers/docker-machine-driver-vmware/releases.
  • Create a folder at C:\Program Files\docker-machine-driver.
  • Copy docker-machine-driver-vmware_windows_amd64.exe to this folder.
  • Rename docker-machine-driver-vmware_windows_amd64.exe to docker-machine-driver-vmware.exe.
  • Add this folder to your Windows PATH variable as above.

Install kubectl

  • These steps are distilled from the instructions at Install and Set Up kubectl.
  • Download the latest version of kubectl for Windows/AMD64.
  • Create a folder at C:\Program Files\Kubectl.
  • Add the kubectl.exe to this folder.
  • Add this folder to your Windows PATH variable.

Check the version

kubectl version --client

Install Minikube using an installer executable

These instructions are distilled from the MiniKube documentation. Please note that I specify the hypervisor driver as vmware. To install Minikube manually on Windows using the Windows Installer for AMD64, download minikube-installer and execute the installer.

Start the Minikube

Use vmware as the hypervisor driver

minikube start --driver=vmware

Example output

The first time we start Minikube, we download the VM boot image.
Windows PowerShell
Copyright (C) Microsoft Corporation. All rights reserved.
PS C:\Users\myuser> minikube start --driver=vmware
* minikube v1.9.1 on Microsoft Windows 10 Enterprise 10.0.17134 Build 17134
* Using the vmware driver based on user configuration
* Downloading VM boot image ...
    > minikube-v1.9.0.iso.sha256: 65 B / 65 B [--------------] 100.00% ? p/s 0s
    > minikube-v1.9.0.iso: 174.93 MiB / 174.93 MiB [ 100.00% 1.36 MiB p/s 2m10s
* Starting control plane node m01 in cluster minikube
* Downloading Kubernetes v1.18.0 preload ...
    > preloaded-images-k8s-v2-v1.18.0-docker-overlay2-amd64.tar.lz4: 542.91 MiB
* Creating vmware VM (CPUs=2, Memory=4000MB, Disk=20000MB) ...
* Preparing Kubernetes v1.18.0 on Docker 19.03.8 ...
* Enabling addons: default-storageclass, storage-provisioner
* Done! kubectl is now configured to use "minikube"
PS C:\Users\myuser>

Verify that the Kubernetes cluster is running

Check the Minikube’s status.
Windows PowerShell
Copyright (C) Microsoft Corporation. All rights reserved.
PS C:\Users\myuser> minikube status
m01
host: Running
kubelet: Running
apiserver: Running
kubeconfig: Configured
PS C:\Users\myuser>
Get the kubectl cluster info.
PS C:\Users\myuser> kubectl cluster-info
Kubernetes master is running at https://192.168.150.129:8443
KubeDNS is running at https://192.168.150.129:8443/api/v1/namespaces/kube-system/services/kube-dns:dns/proxy

To further debug and diagnose cluster problems, use 'kubectl cluster-info dump'.
PS C:\Users\myuser>

Minikube Start up and Clean Up

Here, we have an example Minikube start (with the VM boot image already installed), followed by stop and delete.
PS C:\Users\myuser> minikube start --driver=vmware
* minikube v1.9.1 on Microsoft Windows 10 Enterprise 10.0.17134 Build 17134
* Using the vmware driver based on user configuration
* Starting control plane node m01 in cluster minikube
* Creating vmware VM (CPUs=2, Memory=4000MB, Disk=20000MB) ...
* Preparing Kubernetes v1.18.0 on Docker 19.03.8 ...
* Enabling addons: default-storageclass, storage-provisioner
* Done! kubectl is now configured to use "minikube"
PS C:\Users\myuser> minikube stop
* Stopping "minikube" in vmware ...
* Node "m01" stopped.
PS C:\Users\myuser> minikube delete
* Deleting "minikube" in vmware ...
* Removed all traces of the "minikube" cluster.
PS C:\Users\myuser>


Versioning in Git using Tags

Recently, I looked at tagging different versions of my project. First, I reviewed the Git manual1 and found the instructions for creating an annotated tag.

git tag -a v0.2 -m 'development version'

Once you have a tag, your list of tags can be reviewed using

git tag

Of course, at this point, the tag is still on the local repo. So, to push this tag to the master server, I used the following, where v0.2 is my tag.

git push origin v0.2

Now, when a team member wants to clone or fetch the latest repo, they will get the tag as well. Then, if they need the code from a tagged version, they can check out the tag as follows.2

git checkout tags/v0.2


References

Git Manual, 2012, accessed  21 April 2014, <http://git-scm.com/book/en/Git-Basics-Tagging&gt;.

Stack Overflow, 2012, accessed  21 April 2014, <http://stackoverflow.com/questions/791959/how-to-use-git-to-download-a-particular-tag&gt;

Getting the Duration of a Video with PHP

I wanted to calculate the duration of a video in seconds as in integer variable. For this I needed software outside of PHP. So, I decided to use the open source video encoding library, avconv, running on Linux Mint / Ubuntu.

If you pass a video to avconv, it returns meta-data about the video, including its duration, e.g.

$avconv -i myvideo.mp4
avconv version 0.8.10-6:0.8.10-0ubuntu0.13.10.1, Copyright (c) 2000-2013 the Libav developers
built on Feb  6 2014 20:53:28 with gcc 4.8.1
Input #0, mov,mp4,m4a,3gp,3g2,mj2, from 'myvideo.mp4':
Metadata:
major_brand     : mp42
minor_version   : 1
compatible_brands: mp42mp41
creation_time   : 2013-11-23 13:44:21
Duration: 00:00:03.76, start: 0.000000, bitrate: 393 kb/s

A search on the Ubuntu forums returned an easy way to parse the above output using Linux scripting1.

avconv -i myvideo.mp4 2>&1 | grep 'Duration' | awk '{print $2}' | sed s/,//

This will extract the timestamp after the text after “Duration”. The 2>&1 is important as avconv sends it’s output to standard error rather than standard output. I coded this in PHP as below.

$cmd = "avconv -i '$video' 2>&1 | grep 'Duration' | awk '{print $2}' | sed s/,//";
exec($cmd, $result, $error);
$duration = $result[0];

Once, I had the above data (e.g.  “00:00:03.76”) in a string, I needed to convert it to an integer value. Further research returned the following snippet of PHP code

list($hours,$mins,$secs) = explode(':',$duration);
$seconds = mktime($hours,$mins,$secs) - mktime(0,0,0);

The first mktime returned a timestamp relative to the current time, so we need to subtract the number of seconds from the current timestamp at midnight. This gives us the number of seconds in our video as an integer value.

 
References

Raguet Roman, 2012, accessed  21 April 2014, <http://www.askubuntu.com/questions/224237/how-to-check-how-long-a-video-mp4-is-using-the-shell>.
2012, Stack Overflow, accessed  21 April 2014,<http://www.stackoverflow.com/questions/4605117/how-to-convert-hhmmss-string-to-seconds-with-php>.


Splitting a file path in PHP

During the week, I was faced with the problem of dividing a given string containing a file path into the file name, extension and the path to the file’s directory. For example, “/home/myuser/myfile.ext”, has to be split into “/home/myuser/”, “myfile” and “ext”.

My first instinct was to use PHP’s explode(function to split the string on the forward slash. This would give me my file name and extension in the last element of the returned array and each of the directories of my path in the preceding elements. Of course, I would then have to build my directory path from these elements before returning the result, re-inserting the forward slash along the way.

This did not strike me as an elegant way to proceed. So on further reflection, I started my solution using basename(). This returns the file name and extension for a given file path. From here, I used explode to split the base file name into it’s file name and extension. Note that I did not store the “.” between the file name and extension as the specification did not require this.

Now, I needed the directory path to the file. Of course, my input string already had this information. I just had to remove the file name and extension from the end. So, I used substr() to get the sub string from the start of the source path less the length of the base file name (with it’s extension).

This struck me as being a more succinct resolution which is more intuitive to understand. I have included some sample code below.

class PathSplitter {

    function __construct() {
        $source = "/home/myuser/myfile.ext";
        echo "Source path: {$source}\n\n";

        $splitPath = $this->splitPath($source);

        echo "Split Path:\n";
        var_dump($splitPath);
    }

    private function splitPath($source) {

        // Get the file name and extension, i.e. the basename
        $baseName = basename($source);

        // Break down the basename into file name and extension
        $parts = explode(".", $baseName);

        $name = $parts[0];
        $extension = $parts[1];

        // The path is the full path name less the basename
        $path = substr($source, 0, -strlen($baseName));

        $splitPath = array(
            "path" => $path,
            "name" => $name,
            "extension" => $extension
        );
        return $splitPath;
    }

}

Creating a Linux disk image

One of my colleagues needed to set up a server to run the software I was developing. To make his task easier, he suggested that I create a disk image from my development virtual machine.

The most important thing is the configuration would be taken from my Linux environment and so would be guaranteed to run with minimal setup required. As a bonus, he would also get the latest version of my code.

My colleague suggested using Remastersys. This is a tool which can image the Linux environment that it is running on.

Installation of Remastersys was straightforward.

$sudo apt-get update

$sudo apt-get install remastersys remastersys-gui

Once installed, I attempted to make a backup of my entire virtual machine.

$sudo remastersys backup custom.iso

It was soon obvious that this was not the best approach. I had a lot of large files from previous work. The disk image failed to create as I ran out of space on my fixed size virtual disk. On failure, the image size was over 11GB, which was way too big for my purpose.

My first reaction was to remove most of the large files.  This time the ISO file was created properly, but again it was large at over 3.4GB. My colleague was at a remote location, and I needed to share the image with him through DropBox. A quick check confirmed that my DropBox account was restricted to 2.5GB of data.

So, I needed a different approach. At this point, I realised that the image did not need most of the files in my home directory, which included a lot of test data as well as development tools. So, I could make a distribution image which excluded my home directory.

In order to accomplish this, I needed to move my project code out of its cloned repository in my home directory and move it to an accessible location for the distribution image. I had to update my Apache virtual hosting configuration and reload Apache. [Please see my last post , Installing Laravel on Linux Mint / Ubuntu/]

Once, this change was made and tested, I removed the Remastersys data related to creating the previous image.

$sudo remastersys clean

Now, I was ready to create my distribution image.

$sudo remastersys dist custom.iso

Once complete, the new ISO image was 2.4GB in size. While still large, it was manageable. I managed to upload the image to my DropBox account and share it with my colleague, who was able to set up his server with a single clean installation.

Finally, as the disk image was created, I reset my Apache virtual host to point to my cloned source code repository, so that I could continue my development as before.

Installing Laravel on Linux Mint / Ubuntu

Recently, I went to install the Laravel PHP framework on a fresh virtual machine. Here are the steps that I went through.

First of all, I created a directory for my project and made this my current directory.

$ mkdir myproject
$ cd myproject

I decided to use Composer to install Laravel. In order to install Composer I needed to use curl. So, I needed to install curl.

$ sudo apt-get install curl
$ curl -sS https://getcomposer.org/installer | php

If you want to execute composer directly, so instead of typing…

$ php composer.phar

You can do the following…

$ sudo chmod +x composer.phar
$ composer.phar 

If you want composer to be globally accessible from any folder on your Linux environment, then use the following…

$ mv composer.phar /usr/local/bin/composer

Next, I went to install Laravel. Here, I got an error saying “Mcrypt PHP extension required”. This was resolved as follows.

$ sudo apt-get install php5-mcrypt

Then, I tested mcrypt as follows.

$ php --ri mcrypt
Extension 'mcrypt' not present.

So, I needed to more than just install mcrypt. This was resolved as follows.

$ sudo ln -s /etc/php5/conf.d/mcrypt.ini /etc/php5/mods-available
$ sudo php5enmod mcrypt
$ sudo service apache2 restart

Now, I could test as below.

$ php --ri mcrypt

mcrypt

mcrypt support => enabled
mcrypt_filter support => enabled
Version => 2.5.8
Api No => 20021217
Supported ciphers => cast-128 gost rijndael-128 twofish arcfour cast-256 loki97 rijndael-192 saferplus wake blowfish-compat des rijndael-256 serpent xtea blowfish enigma rc2 tripledes
Supported modes => cbc cfb ctr ecb ncfb nofb ofb stream Directive => Local Value => Master Value mcrypt.algorithms_dir => no value => no value mcrypt.modes_dir => no value => no value

Finally, I was ready to install Laravel using Composer. In the following command, I use the folder name “back-end” to store my Larvel files.

$ php composer.phar create-project laravel/laravel back-end –-prefer-dist

There is a note on the Laravel documentation that Laravel needs to configure folders within app/storage with write access by the web server. I achieved this as follows.

$ cd back-end/app
$ sudo chown -R www-data:www-data storage

Next, I wanted to set to Apache virtual hosting to point to my Laravel public folder. As in a previous blog entry, I copied my /etc/apache2/sites-available/000-default.conf to mysite.conf.

$ cd /etc/apache2/sites-available/
$ cp 000-default.conf mysite.conf

In mysite.conf, I updated the DocumentRoot directive to point to my local repository. The extract from mysite.conf is as follows. The public folder is Laravel’s public folder.

...
DocumentRoot "/home/myuser/myproject/back-end/public/"
<Directory "/home/myuser/myproject/back-end/public/">
Options Indexes FollowSymLinks MultiViews
    # changed from None to All
    AllowOverride All
    Require all granted
</Directory>
...

Note the line “Require all granted”. This command has been updated from my earlier blog post and is required by Apache 2.4. One of my previous blog entries listed the following lines instead. These are now out of date.

Order allow,deny
Allow from all

Once mysite.conf was updated, I used the following commands to activate the new virtual host. I disabled the default site, enabled my virtual site and reloaded Apache.

$ sudo a2dissite 000-default && sudo a2ensite mysite
$ sudo service apache2 reload

Finally, I tested my Laravel installation by loading localhost on my web browser to get Lavavel’s default home page.

Transferring Files to Virtual Box

To facilitate debugging some problems with encoding large video files using open source software running on Linux, I decided to run the encoding software on a virtual machine. Initially, I copied the data onto the Windows host from a memory stick.

The next step was to do the encoding. I needed to copy the source video to my VirtualBox virtual machine. My first thought was to use Virtual Box’s file sharing feature. To enable this, I had to install the VirtualBox Extensions. Then, I discovered that I would have to buy a licence, to use the Extensions beyond the trial period, as only VirtualBox itself is open source. To try it out, I opted to install the Extensions for the one month trial period. However, I got an error when trying to install the Extensions.  A second attempt yielded the same result.

I did not have time to resolve the error, as I needed to look at problems found with video encoding. To get working on our debugging, I copied the video files to the virtual machine using a USB stick, which turned out to be very slow and laborious.

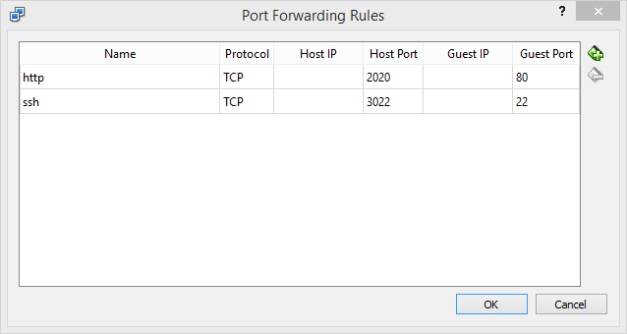
Then, I remembered from previous research that I had configured port forwarding on my virtual machine. This experiment involved loading web pages on the Windows host served by Apache on the virtual machine (VM). I did this through port forwarding. At the time, I had also configured port forwarding to allow ssh access to the VM.

A colleague pointed out that scp uses the same port as ssh (port 22). So, I should be able to use port forwarding to transfer files using scp from Windows to my VM.  Please see the below screenshot.

Image

At this point, all that I needed to do was configure WinSCP on Windows to transfer to the local host using the port 3022 which was mapped to port 22 on the VM. So, on the WinSCP Login page, I set up a session with as follows:

File protocol: sftp

Hostname: 127.0.0.1

Port number: 3022

This worked very well. It still took some time to transfer the large video files back and forth. The files were so large that it was better to delete them from the VM once they had been encoded and copied back to the host via scp, as the VM’s virtual hard disk was limited in size.

It would be a faster work flow to enable file sharing as the shared folder would be available on both the host and VM simultaneously. However, this was a useful solution given the fact that the VirtualBox Extensions would not install on my system. In addition, if only occasional file transfer is involved, then the VirtualBox Extensions may be avoided, thus avoiding the associated licensing costs.

Video Encoding with Large Files

This week’s issue relates to encoding large video files. I had previously integrated open source software to encode video from a variety of formats to H.264 (using an mp4 container). The software worked fine with test data from small video files. Recently however, we have been testing with more realistic data from longer videos.

Soon into this stage of testing, we found that the encoding software which was running on our test server was failing.

We use the open source software ‘melt’ on Linux to do the video encoding. ‘Melt’ usually runs as a two-pass process.

So I went to look at our logs and determined that the ‘melt’ first pass in particular was failing. Next, I checked from running ‘top’ in another terminal that melt was using more and more memory and was terminating at 92% of total memory.

As I suspected that the Linux Out-Of-Memory killer had terminated the process, I went to check the kernel logs, as follows.

$ tail /var/log/kern.log
kernel: [32941851.928772] Out of memory: Kill process 3318 (melt) score 927 or sacrifice child
kernel: [32941851.928788] Killed process 3318 (melt) total-vm:4400676kB, anon-rss:3551936kB, file-rss:140kB

This confirms that the OOM-killer terminated the melt process as memory needs to be reclaimed to ensure that Linux could continue to run.

Now that I knew the source of the problem, first I tweaked the melt parameters to reduce its workload. However, the same problem occurred again with only a slight improvement in how far the encoding went.

Following one from this, I checked our Linux box and saw that no swap space had been allocated. From here, I could see that the solution was to configure swap memory in Linux to allow the melt process to complete.

So, we allocated 2GB of swap memory in addition to the existing 4GB of RAM and ran the encoding test again. This time, everything ran smoothly, with the swap memory being used to supplement RAM.

Using a virtual machine as a development environment

For my last project, I decided to use Linux as my development environment.  My laptop runs Windows and I wanted to try using Linux without setting up a dual-boot system. I tried VMware Player and installed Linux Mint with the Mate interface. I have Linux Mint with Cinnamon, so this would be a way to try a different variation.

I found the virtual machine to have good performance apart from the User Interface, which showed some lag for scrolling, especially when using MySQL Workbench, which depends on a graphical representation for the schema.

Overall, it was good to have a complete development environment which is separate from that of my main work. I configured the Apache environment to work with my repository. All of these changes are encapsulated in one folder on the host machine, which I zipped into an archive file. This makes it easier to make configuration changes as you can always roll back.

Recently, I looked at Oracle Virtual Box. This is open-source software. It looks to be quite a good program, and I plan on using it going forward for a personal project. I may move some of the work of my main project from Windows onto a Linux virtual machine, time permitting.